3.
Rust/Dirt
The next step is now to put some rust on the other edges.
3.1 "rust" layer
First, create a layer named "rust" or whatever, on the top of
the "metal2" layer (and let the blueprint layer be visible again):

Now create a new swatch named "OFP_Rust" or so and use the following
properties :

Once it's done, select the Paint Brush tool and use these settings :

Click on the "Presets:" icon and save your preset as "OFP_Rust"
or so.
Now use these settings to paint all the unsharp edges of your textures.
simply drag and drop your mouse, passing more than once at the same place.
By passing twice at the same place, you will make it look dark. Apply
it this way :

Experiment a bit with it, you will understand quicly how it works... Apply
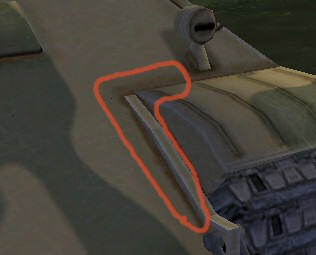
it on the shown bondaries :

Once you've done with it, you should obtain something similar to this
(after hiding the "blueprint" layer):

You can download the psp file here : sample
4.zip
3.2 "dirt" layer (if applicable)
In the mechanical areas, it would be better to replace the rust by some
dirt/grease, on the engine area, wheels, screw,... The way to do it is
exactly the same, only the color is different. So you will have to setup
a new swatch named "OFP_dirt" and use the following settings
:

Note :
If you use light colors as dark yellow etc... you should lower the transparency
a bit, as 80 or 90% for exemple. It depends on the quantity of rust/dirt
you want...