4.
Metal plates

What i call metal plates here is the machinegun ball, the driver view
thingy and all the "melted parts" you can see on the sides.
Every part will be independant and have its own layer group. This is how
it works :
4.1 General shape
First, create one layer and group per specific part and name it the same
name (machinegun ball for the machingun ball etc...)

Using the selection tool, select the shape you want to do (I recommand
ticking the "antialiasing" box). You can have different shapes
in the "selection type" box, or you can also use the "Free
hand selection" tool ![]() and choose the "point to point" selection type.
and choose the "point to point" selection type.
Once you have your selection done, choose your background colour (in this
exemple, dark yellow) and use the fill tool ![]() to fill the selection with this color as this :
to fill the selection with this color as this :
In the end you should obtain the following (with all the parts grouped
in their respective layer group):

Keep a copy of each layer before applying the effects. Use the "duplicate"
button for that :
![]()
4.2 Inner Bevel effect (3d effect)
Now these different parts will need to have a 3d effect. These effects
are obtained by the "Inner Bever effect" available under "Effects/3dEffects".
As for the paint brush tool, you are now going to do some preset so you
can re-use it as much as you want.
One of the most useful is this one :

I use it for the driver view thingy for exemple. It makes the plate looking
like emerging from 2 cm or so...
I use it as well for the melted parts, but I change the "Angle"
setting and set it to 135 (the opposite direction), so the metal looks
like a hole of 2cm or so...
another one is this one :

This is the one I use for the machinegun ball.
For other parts like the tools or any other 3d object you'll have to draw
on your texture, the best thing to do will be to experiment yourself the
effect you think is the best. "Depth" sets the depth of the
metal part, "Width" sets the width of the bevel effect, and
"Smoothness" make it look smooth or sharp. That's basically
all you have to change apart from the Bevel shape and Angle of the light.
Make sure there is no selection on the current layer when you apply this
effect ! If so the effect will look different.
Once you applied the effects to the different parts, it should look like
this :

4.3 Removing the background colour (only if you use camos)
If you have to use camos, it becomes necessary to remove the dark yellow
colour from the metal plates. To do so, select the layer you want to remove
the color from, then press CTRL+A or "Selection/Select All".
Then "Selection/Modify/Select color range...". You will have
to use the following settings :

The "tolerance" setings can be set to 25 or so if there is too
much dark yellow left. Note that the reference color is the dark yellow
selected from the swatch. If you are using another colour, then select
this color !
Once you are happy with the settings, click ok, and invert the selection
by "selection/Invert" or CTRL+SHIFT+I. Press delete on your
keyboard and the dark yellow part will be deleted. You should obtain something
similar to this :

4.4 Metal edges, dirt and rust.
Now all these parts will beed their own metal & metal 2 layers and
rust or dirt. For exemple, the machine gun ball will need some rust one
the edges, the melted parts will need some metal edges on the inside part
and rust on the outside, the driver view thing will need some metal edges
on the outside and rust as well.
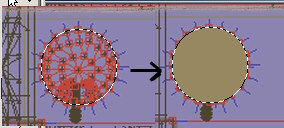
Add the Rust on the machine gun ball :
Add the metal edges and rust on the driver view thing. This one needs
metal edges because it can opened so the edges of the hole makes a sharp
edge :

Add the metal edges and rust to the melted parts :

4.5 mask
If you look at it close, you will see that, because the "metal plate"
is transparent, it happens somtimes that the metal edges or the rust are
on both sides instead of just being in one. This is especially true for
machine gun ball. There is some rust on the ball that shouldnt be there.
To avoid this, we are going to create a mask using the copy of the general
shape layer.
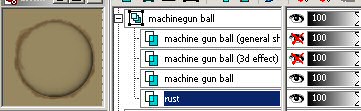
First create the mask like this : click on the rust layer and then on
the mask button :

The mask controls every layers under it in the same layer group. So here
it only controls "rust". The mask is a greyscale layer. White
indicates the pixels have to be completely shown, grey indicates it has
to be half-transparent and black indicates it has to be completely hidden.
By default the mask is completely white so it shows everything. We are
now going to hide the rust under the machine gun ball :
Select the "general shape" layer, then CTRL+A and then CTRL+F,
or click "selection/select All" and "selection/Float".
Once it's done you should obtain this :

Drag and drop this "Floating selection layer" and put it above
the mask like this :

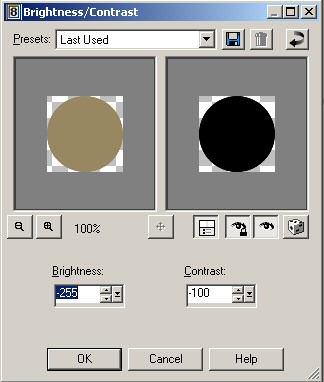
Press SHIFT+B or click "Adjust / Brightness and contrast / Brightness
contrast..."
Use the following settings, so it can turn any colour into black :
Click ok, then right-click on the "floating selection" layer
and select defloat, or press CTRL+SHIFT+F.
Repeat the same operation to any metal plates which needs to. You should
obtain the following :

You can download it here : sample
5.zip
Note :
Sometimes the metal plates looks too dark (especially with light colors),
so it becomes necessary to lower the transparency to 80% or so.