5.
Lighten/Darken
Start this step once you'll have every details on texture already... Because
you will need to know the location of every metal plates and stuff before
starting it. This step is quite experimental to me and i think i really
have to im prove it... but here are my last results :
5.1 the tools
The first thing to do will be to set up a Lighten / Darken tool. This
is a preset to use with the paint brush. Use the following settings :

That's it. Nothing else to do. the color to lighten will be pure white
[Red : 255, Green : 255, Blue : 255] and the color to darken will be pure
black [Red : 0, Green : 0, Blue : 0].
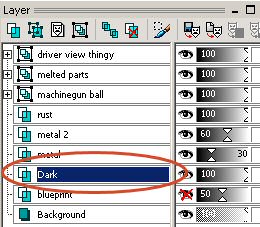
5.2 Darken
Create a layer named "dark" or whatever just above the "blueprint"
layer :
Select the black color on the swatches (be sure it's pure black, not very
dark grey !), and apply it this way :

Once again, make it rounded on the corners. You should obtain the following
:

5.3 Lighten
Create a layer named "light" or whatever just above the "dark"
layer :

Select the white color on the swatches, and apply it this way :

Dont drag and drop : do it dot by dot. There is no need to be precise,
so keep on click click click click click click click click click click
clicing... dont leave any big gaps between the dots... if you do it well
you should only have some random gaps, and the contrast between the light
and dark layer should be rounded shapes all around the edges, as this
:

For the small part to fill, you will have to reduce the size of the paint
brush from 20 to 10 for exemple.
Once you've done with it, reduce the transparency of both layers to 20%
:

It should look like this :
