This tutorial intends to teach you how to create hidden selections in your models. What is an hidden selection ? It's a part of your model which you can decide to show or to hide in your config.ccp. Basically it helps generating a great variety of vehicles with only one model.
As an exemple, look at these two sturmtigers :

In fact, they were generated from the same .p3d file. I will explain here how to make that ring around the gun as an hidden selection. So this is how it works :
1. Create the model
In fact you just have to create the model with all the future hidden selections on it. So if you want a sturmtiger with or without "ring", then create a sturmtiger with that "ring" (like the model in the background of the picture). The purpose of the hidden selection is to hide the "ring" in the second model (in the foreground of the picture).
2. Create the selection.
The first step is just to create the selection itself. So edit all your lods, including the crew views, fire geometry, geometry and hit points. Select the part you want to be an hidden selection using one of the selection tools. In this case, I will select the "ring" :

Once it's selected, right click in the named property box, and click new :
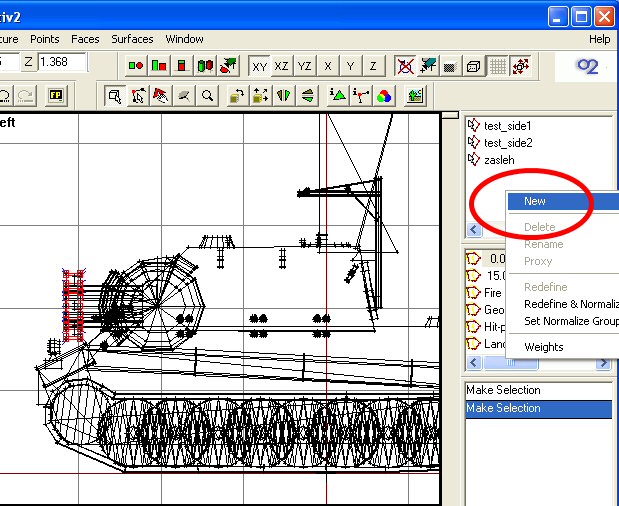
Then name it "Ring" for exemple :

Repeat the same operation for all your lods. In this case, note that the ring is part of the gun named selection (otochlaven) as well, so when the gun moves, the ring moves.
3. setup the config.cpp - class CfgModels
Ok, now the hardest part : assuming you allready have a config.cpp for your addon, you now have to declare your model. Edit it and add a "class cfgModels" if you don't have one. Have a look at this exemple :
| class
CfgModels { class Default{}; class Vehicle: Default{}; class Tank: Vehicle{}; class Sturmtiger: Tank{ sections[]={"Armor_Plates","Ring"}; }; }; |
if
you declare a tank, you first have to declare the tank class and then
the "mother" class of the tank class etc... just as you do in
the cfgVehicles class for your vehicle. if you dont know the cfgModels
class yet, I suggest you to have a look at this commented config.cpp file
from bis here :
http://www.flashpoint1985.com/breathe/download/Commented_Config_191.zip
or just have a look at a similar addon that already uses hidden selections.
then
you declare your model class. The name must be the same as your .p3d file.
in this case it's Sturmtiger.p3d, so the class name will be Sturmtiger.
As you can see, this class is a "son" of the Tank class. So
add a sections property, and put the list of your hiddens selections inside.
Here I got "Ring" and also "Armor_Plates" which I
used for the armored plates on the side. It was, of course, set in the
same way as the Ring in the .p3d.
4. setup the config.cpp - class CfgVehicless
Once you've declared the model, you'll have to declare your vehicles. look at the following exemple :
class
CfgVehicles class
JOFB_Sturm3:JOFB_Sturm{ |
First,
declare a normal tank. In this exemple it's JOFB_Sturm. In this class
you will put all the properties from your tank, such as gun, ammo, speed,
armor, crew, etc... Add a preperty names "hiddenSelections"
to this tank wich will contain the selections you want to hide. In that
case, the first tank got all the options so we hide nothing.
The second one is JOFB_Sturm2, wich is a "son" or a "subtype"
of JOFB_Sturm, so you dont have to re-declare all the properties like
crew, armor etc... exept if you have a different crew etc... The only
difference will be the name, and the "hiddenSelections". In
this one, we hide everything, so you have to put all the selections in
the list.
The third one, JOFB_Sturm3 is similar to the previous one, except it got
the Ring, so we only hide the Armor_Plates.
Once you've done that, everything is finished and you will have 3 tanks
in the game for the price of one !